A 60-inch window does not necessarily need 60 inches of curtains. The rod may be wider, the fabric needs room to fold, and the rings can change where the top of the panel hangs.
The easiest way to get the order right is to keep those measurements separate. Start with the hardware, calculate the width, then work down to the finished hem.
1. Name the measurements before you take them
For this guide, we are measuring a straight rod mounted outside the window trim and curtains that close over the opening. Use one unit throughout your notes. The worked example uses inches.
| Term | What you measure | Example |
|---|---|---|
| Window width | Outside edge to outside edge of trim for this outside-mounted example | 60 in |
| Rod or curtain span | Usable straight span to be covered, excluding decorative finials | 76 in |
| Combined flat fabric width | All unpleated panel widths added together | 152 in target at 2x fullness |
| Width per panel | One panel laid flat, if that is how the seller states its width | 50 in for the narrow-panel comparison |
Measure with a tape, write each number down and label it. “Width: 76” is useful only if you remember which width it was.
For a bay, curved track or specialist heading system, use that supplier's measurement method. A flat rectangle does not describe every window treatment.
2. Choose the heading and rod position
Decide whether you want grommets, rod pockets, tabs, rings with clips or pleated panels. The heading controls how fabric sits on the hardware and how it moves.
Next, decide where the rod will go. John Lewis's measuring guidance suggests a starting position around 4–6 inches above the window, with extensions at the sides. Treat that as a starting point, then check your trim, ceiling and mounting space.
A higher position may suit the room, but test it against available panel lengths before drilling. A standard panel does not become longer because the rod looks better higher up.
Allow space beside the window for the fabric when open. This gathered area is the stack. Heavy or numerous panels can occupy more space than you expect, so an 8-inch extension does not guarantee that every curtain will clear all the glass.
For our example, the window measures 60 inches across the outside trim, and the planned curtain span extends 8 inches on each side:
60 + 8 + 8 = 76 inches of curtain span.
Exclude decorative finials. Check the usable span and the position of brackets or stops: rings may not be able to pass a center support. Follow the rod's installation instructions for support and load.
3. Calculate the combined fabric width
Flat curtains need extra width to form folds when closed. The ratio of flat fabric width to covered span is called fullness.
The Shade Store's width guide describes roughly 1.5–2 times coverage for many drapery fabrics, with more fullness often used for sheers. The selected fabric and heading should set your target.
For a straightforward worked example with flat panels, no wraparound returns and edges meeting at the center, choose 2x fullness:
76-inch span × 2 = 152 inches of combined flat fabric.
That is the total for both sides together. It is not the width required for each panel.
If your rod has returns or your curtains need additional overlap, include the coverage required by that hardware's instructions before calculating flat fabric width.
4. Turn fabric width into a panel count
Divide the target combined width by the flat width of one panel, then round up to a whole panel.
With 50-inch panels, 152 ÷ 50 = 3.04, so you need four to meet or exceed that target. For an equal split, hang two on each side. More generally, round to an even total when you want the same number of equal-width panels on both sides. Three would supply 150 inches, just below the chosen target, and would also give an uneven split.
The rounded quantity changes the actual fullness. Four 50-inch panels provide 200 inches, or about 2.63x the 76-inch span. That may suit a light fabric but create too much bulk in a heavier one.
| Panel choice | Combined flat width | Width divided by 76-inch span | Decision |
|---|---|---|---|
| Two 50-inch panels | 100 in | 1.32x fullness | Below the 2x target; little spare fabric for folds |
| Four 50-inch panels | 200 in | 2.63x fullness | Fuller than the target; check fabric bulk and open stack |
| Two 80-inch panels, if available | 160 in | 2.11x fullness | Close to the target with one panel on each side |
The widths above illustrate the calculation. Check what your chosen retailer actually sells, including whether the package contains one panel or a pair.
For this example, two 80-inch flat panels would be the closer match to the 2x target if that option exists. Four narrower panels are an alternative to assess, not an automatic improvement.
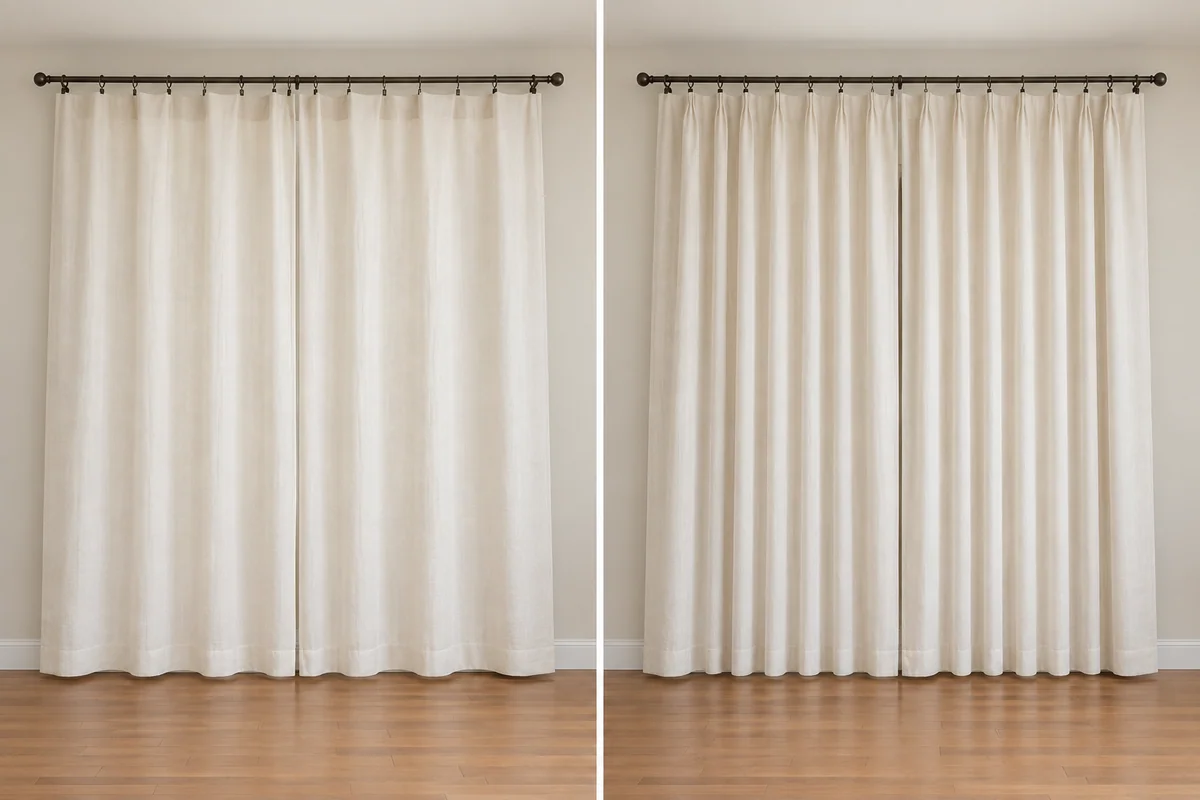
The same window and rod with different amounts of fabric: shallow folds on the left, more generous folds on the right. The photograph illustrates fullness; the tables provide the measurements.
5. Measure length from the actual fabric top
Choose the endpoint first: just above the floor, touching it, or extending onto it. For curtains opened daily, a small float keeps the hem clear of the floor. This example uses half an inch.
For plain panels on clip rings, test the actual ring and clip arrangement. Measure where the top edge of the fabric hangs, not simply to the middle of the rod.
Suppose the top of the window trim is 87 inches above a level floor, and the rod center is 6 inches above that, at 93 inches. In this particular test hang, the fabric top is 2.5 inches below that center, so the top of the fabric is 90.5 inches above the floor.
Subtract the chosen half-inch clearance:
93 − 2.5 − 0.5 = 90 inches of finished fabric length.
The 2.5-inch drop belongs to this example's hardware. Measure yours. A different ring, clip position or hook changes the result.
With grommets, some fabric extends above the rod. With rod pockets or tabs, the fabric and rod meet differently again. Use the seller's stated length convention, then test the hanging position; do not reuse the ring calculation unchanged.
Measure at the left, center and right. If the floor is uneven and you want the hem to clear it everywhere, use the shortest top-to-floor measurement, then subtract your clearance.
6. Match the measurement to a ready-made length
If the required finished length is 90 inches and the suitable panel is 96 inches long, the nominal difference is 6 inches. You can assess hemming it to fit, or revisit the mounting height if the room and hardware allow.
An 84-inch panel would be 6 inches short at the same fabric-top position. Hanging it there and hoping for the best is unlikely to improve the arithmetic.
Before altering, check the care instructions, actual panel length, lining and hem construction. Follow any recommended cleaning or settling process before marking the final hem. Do not assume every fabric can be washed or shortened the same way.
For a sill-length curtain or a window above a heater, choose a suitable endpoint and follow the appliance and curtain clearance instructions. Floor length is not the answer to every window.
| Item | Calculation or measurement | Result |
|---|---|---|
| Window outside trim width | Measured | 60 in |
| Extra span beyond trim | 8 in left + 8 in right | 16 in |
| Curtain span | 60 + 16 | 76 in |
| Target flat fabric width | 76 × 2 | 152 in total |
| If using 50-inch panels | 152 ÷ 50 = 3.04; round up | 4 panels, two each side; 200 in total |
| If using 80-inch panels | 152 ÷ 80 = 1.90; round up | 2 panels, one each side; 160 in total |
| Rod center above floor | Measured installed position | 93 in |
| Fabric top below rod center | Actual ring-and-clip test hang | 2.5 in |
| Fabric top above floor | 93 − 2.5 | 90.5 in |
| Chosen floor clearance | Editorial choice for this example | 0.5 in |
| Required finished fabric length | 90.5 − 0.5 | 90 in |
| If a panel finishes at 96 inches before alteration | 96 − 90 | Shorten by 6 in, subject to care and hemming checks |
Record an order you can check
Your final note should say how many panels, the width of each, the heading, the nominal length you are buying and the finished length you need.
For our closer-to-target option: two flat panels, each 80 inches wide if available, hung on the tested clip rings, with a 90-inch finished fabric length. If buying 96-inch panels, confirm they can be altered appropriately.
Check package quantities, open stack and any center bracket before ordering. Those details are much easier to resolve while the curtains are still numbers on a page.
Frequently asked questions
Are curtain measurements per panel or per pair?
Either convention can appear in a listing. Read both the dimensions and package contents. Two panels that are each 50 inches wide provide 100 inches of flat fabric; a pair described as 100 inches total may mean the same thing.
Should curtains touch the floor?
Choose the finish before measuring. A small float is practical for curtains you open often; a light touch can look tailored; extra length creates a break or puddle. This guide uses a half-inch float as an example, not a universal requirement.
Can I use two panels on a wide window?
Yes, if their combined usable width provides the coverage and fullness you want. Two extra-wide panels can work better than two narrow ones. Check their open stack and whether the header width is flat or already pleated.
Do I double the width of pinch-pleat curtains?
Not if the listed width is the finished pleated coverage. Fullness may already be built into the panel. Follow the seller's coverage and overlap instructions rather than doubling that number again.
What changes if I want curtains to draw to one side?
You still calculate the total coverage, but divide it among the panels that will stack on that side. Do not round to an even count automatically. Check that the rod, rings, brackets and available wall space allow the whole stack to move there.