A small Thanksgiving table can look beautiful right up until someone arrives with the potatoes.
The fix starts before the centerpiece: give the guests and serving dishes their space, then decorate what is left. A few repeated details can make the table feel festive without requiring everyone to hold a glass while the gravy goes past.
1. Measure a dinner setting before adding decorations
Set out one dinner plate, the cutlery the meal needs, a folded napkin and a drinking glass. Measure the whole arrangement, including the glass at the upper right. A plate's diameter alone will underestimate the space.
For a compact setting, put the napkin on the plate, the fork to its left and the knife to its right with the blade facing inward. That follows the placement conventions in Emily Post's informal table-setting guide. Bring dessert cutlery with dessert, and leave out a separate bread plate if the meal works without one.
Here is the deliberately compact setting used in our examples. The measurements are planning assumptions you can reproduce with your own pieces, not standard sizes that every dinner service will fit.
| Item | Example footprint | Position or allowance |
|---|---|---|
| Dinner plate | 10-inch diameter | On a straight edge, its nearest rim is 1 inch inward. |
| Dinner fork and knife | Each within 8 × 1 inches | Alongside the plate, with a 1-inch gap to its widest edge. |
| One drinking glass | 3-inch maximum diameter, including its base | Diagonally at the upper right, above the knife. |
| Folded napkin | Contained on the plate | No additional tabletop area before dinner. |
| Complete compact setting | 16 inches wide × 12 inches inward from a straight table edge | Includes the plate setback and diagonally placed glass; allow more if your pieces need it. |
| Space for each diner | Start around 24 inches of table edge; increase as needed | Separate from the 16-inch object footprint. Test chairs, arms and the table base. |
The glass sits diagonally beside the plate's upper-right edge, above the knife. Moving it directly beyond the plate would make the setting deeper. If you need a second glass, a larger plate or extra cutlery, measure again before reserving a center area.
The objects fitting is only half the test. People need elbow room too. Start with roughly 24 inches of table edge per diner, and allow more for wider chairs or anyone who needs it. This is a furniture-planning benchmark, not a guarantee of comfort. Check the legs and apron as well as the tabletop. Raymour & Flanigan's dining-table guide explains those spacing considerations.
Now bring out the empty serving dishes. Measure their outer rims, handles, trivets and serving spoons together. Use that complete footprint to plan a landing spot.
2. Decide where dinner will be served
Family-style means the serving dishes stay on the dining table and circulate among guests. Sideboard or buffet service means people fill plates at another surface. A hybrid keeps the large dishes off-table and one small, frequently used dish within reach.
| Method | What stays on the dining table | Choose it when |
|---|---|---|
| Family-style | All main serving dishes, with their utensils and trivets. | The actual pieces fit and can be lifted and passed without invading the place settings or elbow room. |
| Sideboard or counter service | The diners’ plates and drinks; center can remain clear. | Serving pieces are large or the available center is too narrow. Bring filled plates to seated guests when helpful. |
| Hybrid | One small shared side or condiment dish; larger dishes stay off-table. | There is a measured landing spot for that dish and it is easy to reach and pass. |
Choose the method after the empty-dish test. If fitting the turkey requires moving someone's glass into their neighbor's setting, the meal needs another serving surface.
You do not need an actual sideboard. Clear part of a kitchen counter or use a sturdy spare table. Protect it appropriately for the dishes, leave a clear spot to put a plate down, and position utensils with the food they serve. Keep drinks away from that landing spot so pouring and serving do not compete.
If guests would find carrying a loaded plate awkward, bring filled plates to their seats. Off-table service can still happen while everyone stays seated.
3. A 42-inch round table: four settings and one changeable center
For this example, place four chairs evenly around a 42-inch-diameter table. Use the compact settings above, positioned slightly farther inward than on a straight edge so the glass and cutlery stay fully on the curved surface.
Allow 14 inches inward from the rim for each setting, including that adjustment. Across the middle, the calculation is 42 − 14 − 14 = 14 inches. Reserve that central 14-inch circle for one shared purpose at a time.
Before dinner, it can hold a 10-inch round tray with a small pumpkin and a low flower arrangement contained within the tray's outline. The flowers count at their widest point, not just at the vase's base.
When dinner arrives, move the tray to its prepared spot away from the serving area. Replace it with one 8-inch serving bowl on a 10-inch trivet, keeping the spoon within that total footprint. Use it for a small portion of a side and refill as needed; diameter does not tell you how much food it holds. Bring the main meal to the plates from the kitchen or buffet; keep the turkey platter and larger sides there for seconds.
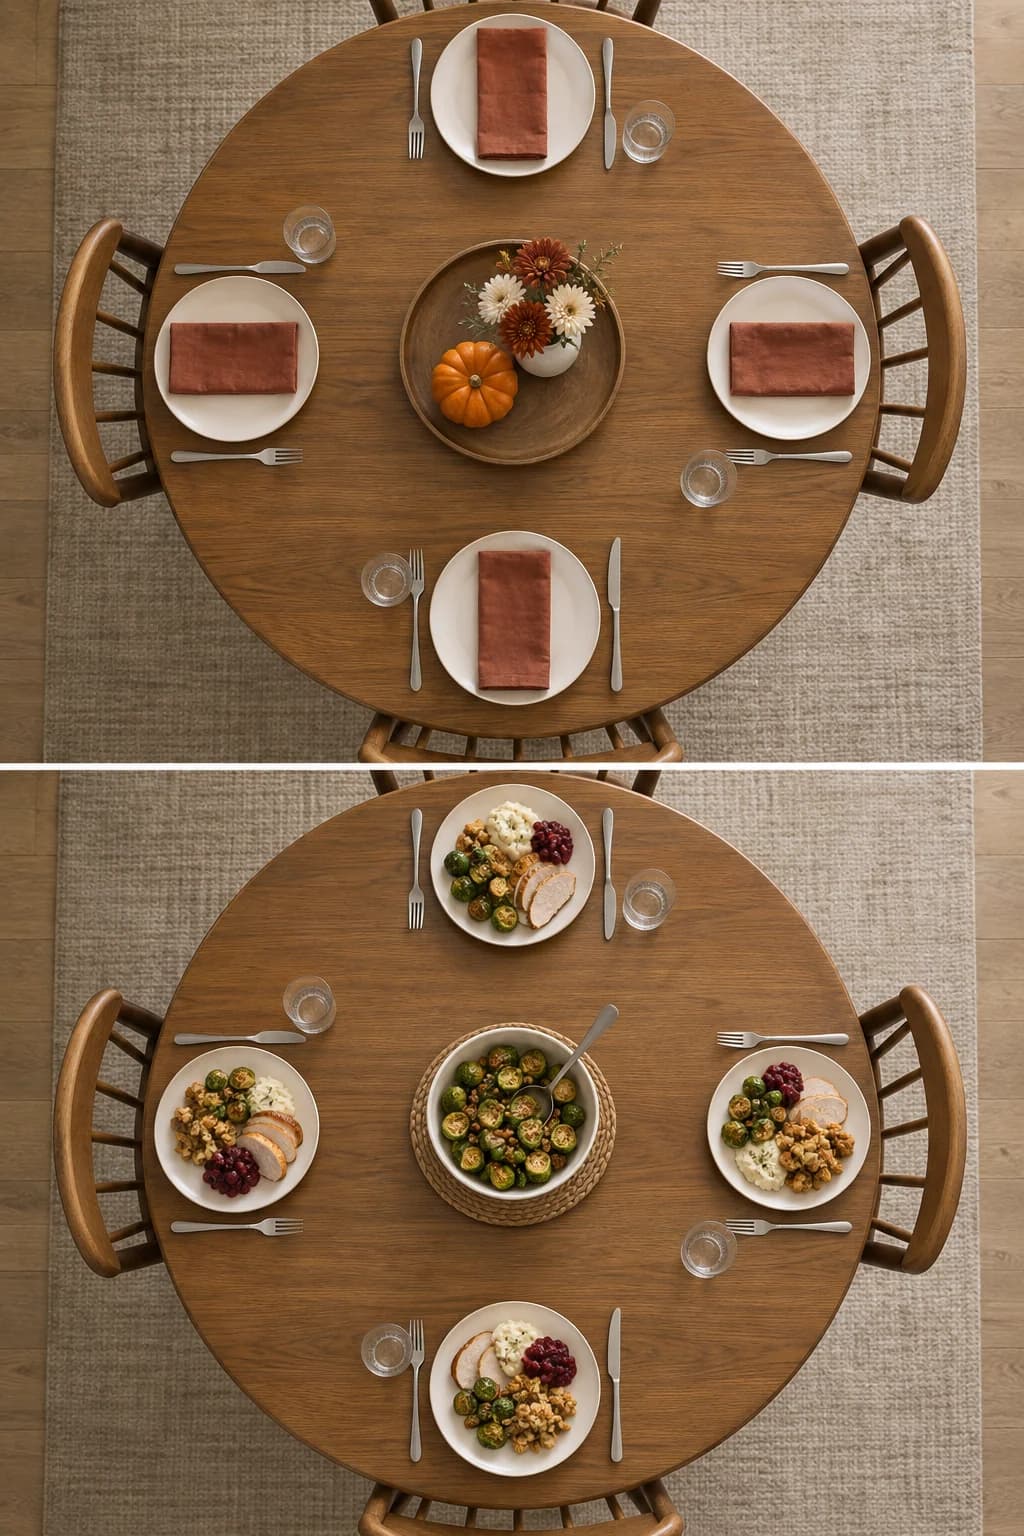
Top: before dinner. Bottom: during dinner. The four settings stay in place while the central tray gives way to a shared bowl. The image illustrates the change; use the measurements below to plan your own table.
| Zone | Before dinner | During dinner |
|---|---|---|
| Guest zone: four evenly spaced positions, 14 inches inward from the rim | One compact setting per guest, adjusted inward for the curved edge. | Same plate, glass and cutlery positions; napkins in use. |
| Center zone: 14-inch-diameter circle | One 10-inch round tray, with all decor contained inside its outline. | One 8-inch bowl on a 10-inch trivet; spoon contained within the total footprint. |
| Off-table food zone: kitchen counter or sideboard | Clear landing space, appropriate surface protection and serving utensils ready. | Turkey platter, larger sides and refills; filled plates come to the table. |
| Decoration destination: separate from the food landing spot | Leave enough room for the complete tray. | The removed tray stays here while people eat. |
This is a four-place example, not a seating promise for every 42-inch table. Pull the chairs in, check knees against the base and try reaching for the bowl. If passing it feels awkward, leave the center clear and serve that side off-table too.
4. A 60 by 30-inch rectangle: keep the serving strip narrow
This example seats four people, two along each long side, with no end seats. Position the settings 15 and 45 inches from one short end, leaving 30 inches between neighboring place centers.
The table's width is the constraint. With a 12-inch-deep setting on each side, the middle measures 30 − 12 − 12 = 6 inches wide.
That strip can hold a little decoration or a small condiment dish. It is not a place to park the whole Thanksgiving menu. Even the short side of a 9 by 13-inch baking dish exceeds it, before you count handles.
Before dinner, use a 12 by 4-inch low tray placed lengthwise at the center, with two small pumpkins contained inside it. At dinner, remove it and put down one relish dish with a total footprint no larger than 8 by 4 inches, including its handles and spoon. Serve the main dishes from the counter.
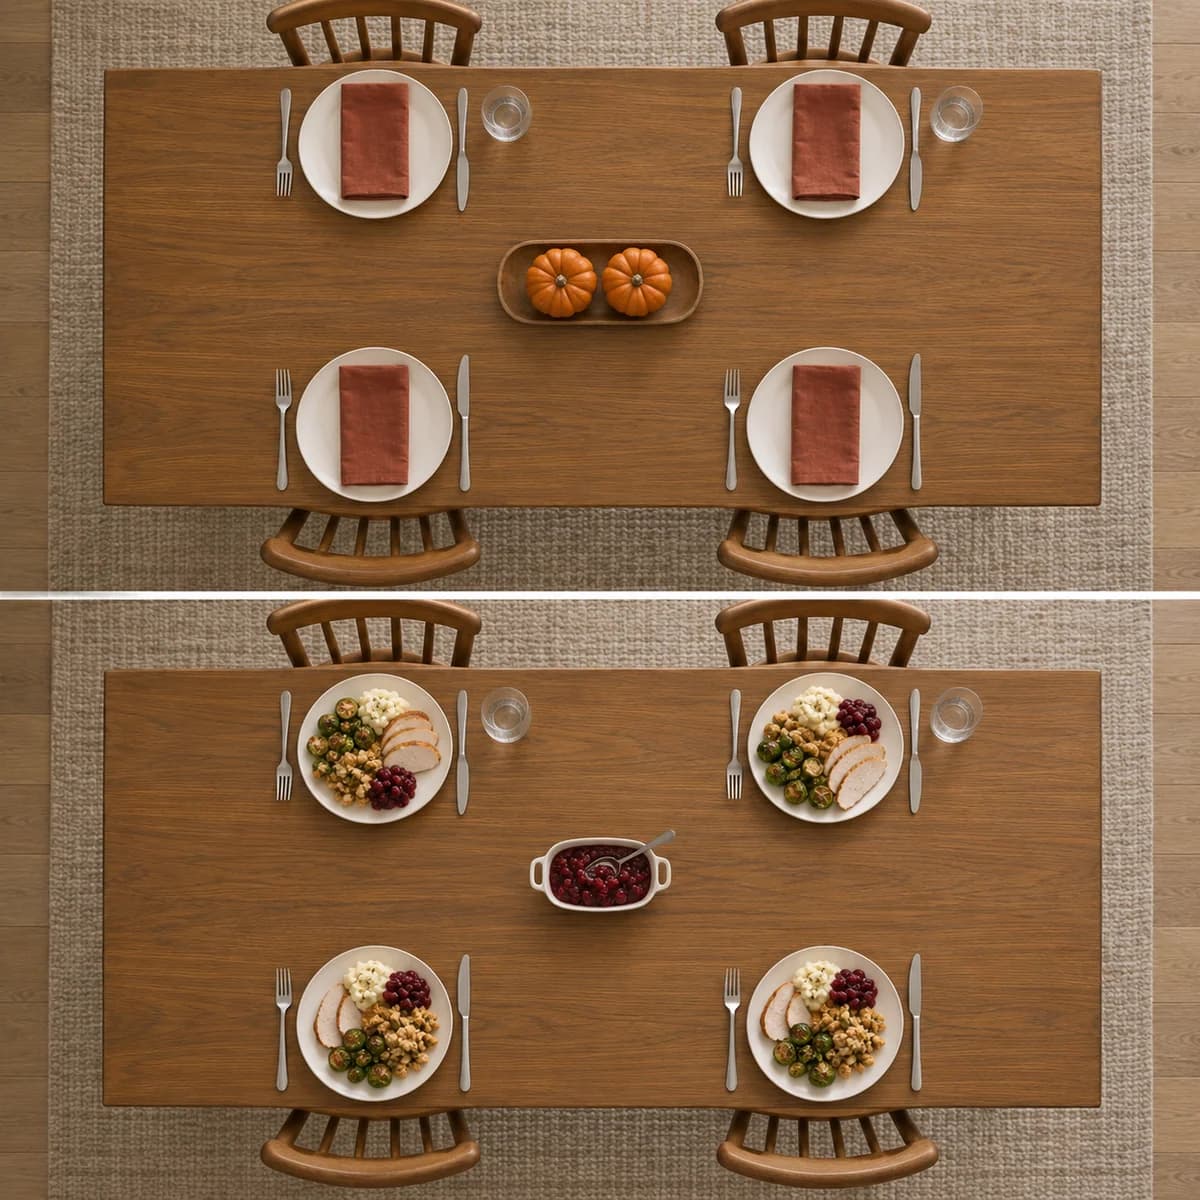
Top: before dinner. Bottom: during dinner. The narrow centerpiece leaves, the small condiment dish arrives, and the full plates return from off-table service. Plates, cutlery and glasses occupy the same positions; the napkins are now in use.
| Zone | Before dinner | During dinner |
|---|---|---|
| Guest zones: 12 inches deep along each long side | Setting centerlines at 15 and 45 inches from one short end; napkins on plates. | Four meal plates, necessary cutlery and glasses; napkins in use. |
| Center zone: 6-inch-wide strip | A 12 × 4-inch low tray, lengthwise at the center, containing two small pumpkins. | One relish dish at most 8 × 4 inches including handles and spoon; 1 inch clear on each side. |
| Off-table food zone: counter or spare serving table | Keep a plate landing spot clear alongside the planned food positions. | All large serving dishes, with plates filled here or brought to seated guests. |
| Between settings and at the unoccupied ends | Keep clear after setting the table. | Preserve room for arms, access and passing; do not add more dishes or guests without replanning. |
Keep the gaps between neighboring settings and the unoccupied ends open for arms, passing and access. Filling every visible gap would undo the point of this layout. Adding end guests changes the plan and needs a fresh test.
5. Put the festive details where space is already allocated
The table can still look like Thanksgiving after the centerpiece leaves. Give the lasting details jobs within the setting:
- Repeat one napkin color. Rust, olive or plum beside simple dinnerware creates a deliberate pattern around the table. Fold each napkin onto its plate before guests sit.
- Use the cloth for the larger gesture. A warm neutral or checked tablecloth adds color across the surface without adding objects to pass around. Keep any runner flat and clear of unstable folds beneath dishes.
- Place a small name card on the folded napkin. It makes the setting personal without taking more tabletop space. Collect the cards before serving so they do not migrate into the food area.
- Choose one removable decoration. A tray makes the whole arrangement easy to lift. Reserve its destination before dinner so it does not displace the turkey on the counter.
Start with the pieces you own. Chargers, layered side plates and bulky napkin ornaments are optional, and each one needs to earn its space in the measured arrangement.
6. Rehearse the table once, with the food still in the kitchen
- Put every chair and complete place setting in position. Sit down, move your arms as if eating, and check that people can get in and out.
- Set out the empty serving pieces where you intend to use them. Include handles, spoons and surface protection, then try lifting and passing them.
- Move the centerpiece to its dinner destination. Confirm that the serving surface still has a clear place for a plate to land.
- Check the route with chairs occupied or pulled out to their eating positions. If carrying food through it is awkward, rearrange before guests arrive.
Take a quick photo of the successful dinner layout. It is a more useful setup reminder than a picture taken before the serving dishes had to fit.
Frequently asked questions
Can I add two more guests to these four-person layouts?
Do not assume so from the spare tabletop. Extra diners change elbow room, chair access and the space around the table base. Set every chair and full place setting in position and test them together. Use a suitable table extension or a second dining surface if the original table feels cramped, then recalculate the serving area.
Should I buy smaller plates for a small Thanksgiving table?
Measure the plates you already own first. Removing an unused charger, separate bread plate or extra glass may recover enough room. A smaller plate only helps if it still works for the meal you are serving; do not shrink the place settings to justify seating people too closely.
What if guests bring food in dishes I have not measured?
Ask ahead about the outer dimensions and whether the dish needs a trivet or serving utensil. Give an unknown or oversized dish a place on the serving counter, with room to set down a plate. Keep a serving spoon ready and avoid assigning that dish to a tightly measured center space.